Viewing Logs for Data Import
When an Import Configuration is run, a Transaction is logged. A Transaction comprises information about the run status of an Import Configuration, and errors generated as a result of running the Import Configuration. You can also view errors generated for the imported records, if there are any. A unique Transaction ID is assigned to the Transaction.
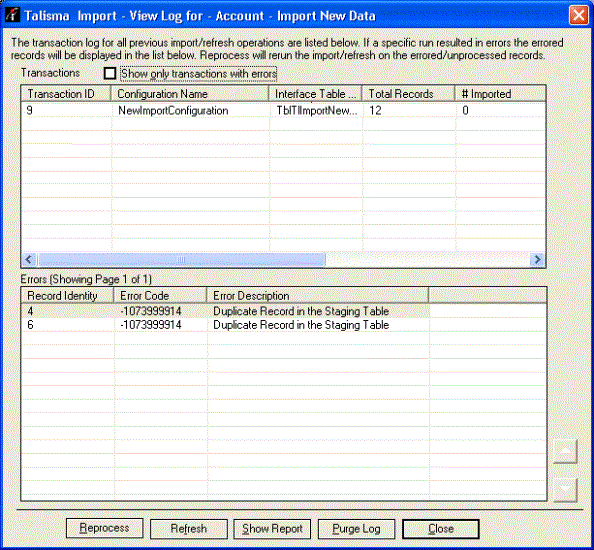
Talisma Import - Transaction Details
The Transactions grid lists the transactions created for the combination of base Object, and Import mode that you specify. The following table describes the columns of the Transactions area:
|
Column |
Description |
|
Transaction ID |
The unique Transaction ID assigned to each run of an Import Configuration. For example, if you run the UKContacts Import Configuration twice, the Transaction IDs 1, and 2 will be assigned to each run of the Import Configuration. |
|
Configuration Name |
The name of the Import Configuration. |
|
Interface Table Name |
The name of the interface table. |
|
Total Records |
The total number of records available for import. |
|
# Imported |
The number of records imported successfully. |
|
# Updated |
The number of records updated successfully. |
|
# Failed |
The number of records that failed. |
|
Start Timestamp |
The time at which the Import Configuration was executed. |
|
End Timestamp |
The time at which the execution of the Import Configuration was completed. |
The errors for a selected Transaction are displayed in the Errors area. The following table describes the columns of the Errors area:
|
Column |
Description |
|
Record Identity |
The ID of the record available for import. |
|
Error Code |
The error code of the error generated. |
|
Error Description |
The description of the error. |
To View the Log for an Import Configuration
1. Log on to the Talisma Data Management Utility.
2. Click Import Configuration.
3. Click View Status and Log.
- OR -
Log on to Talisma Client. From the File menu, select Import Data, View Status and Log.
The Talisma Import - View Status and Log page is displayed.
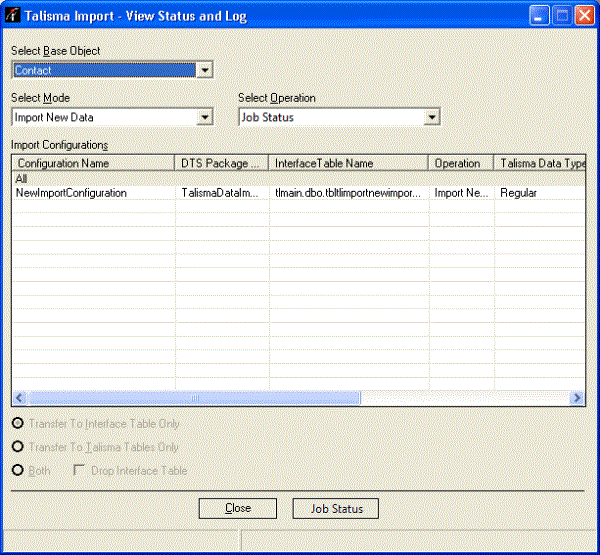
The View Status and Log page
By default, the first Object is selected in Select Base Object list. Import Configurations created for the Import New Data mode, and for the Object selected in the Select Base Object list, are displayed in the Import Configurations area.
4. From the Select Base Object list, select the base Object of the Import Configuration for which you want to view the log.
5. From the Select Operation list, select View Log.
6. From the Select Mode list, select the mode of the Import Configuration for which you want to view the log.
The Import Configurations available for the selected base Object, and the mode of data import are displayed in the Import Configurations area.
7. Select the Import Configuration for which you want to view the status, and click View Log.
The Talisma Import - View Log page is displayed.
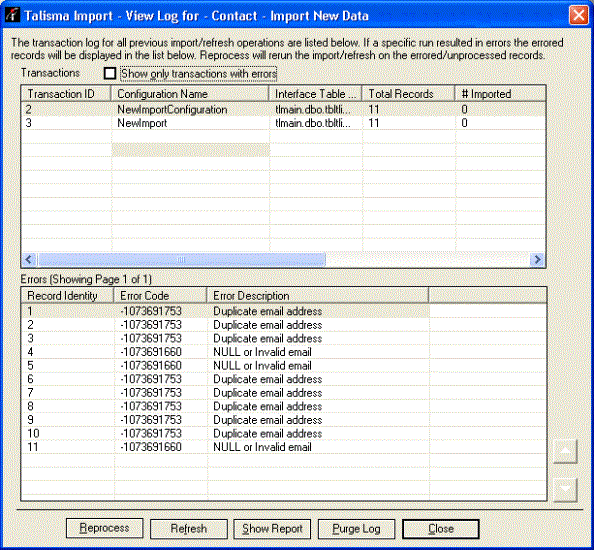
View Log Page for the Base Object
When you view the error log of an Import Configuration in which related Object items are being imported, information about related Object items is displayed in the Related Object Transaction Information area.
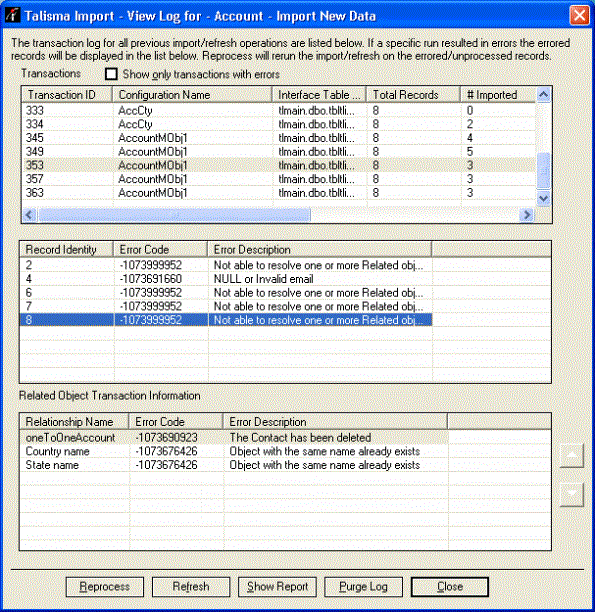
View Log Page for Related Object
8. Select a Transaction in the Transactions grid to view the corresponding errors in the Errors area.
For more information about the errors displayed, see Common Data Import Errors.
9. Click Show Report to view details about the selected Transaction as a Microsoft Excel file.
Important:
You must configure MS Excel to display a minimum of two sheets, by default.
To do this, complete the following steps:
a. Open the Excel file.
b. Go to File > Options.
c. In the General Options dialog box that is displayed, change the value of the field Include this many sheets to 2.
The Excel file displays the data in two sheets. The Summary sheet contains an overview of the Transaction, and the Details sheet contains information about the errors.
|
• Click Reprocess to re-run a transaction that has generated errors. Data will be transferred from the interface tables to Talisma tables only. The SSIS package will not be executed. • Click Refresh to refresh the page with current data. • A maximum of 100 errors are displayed per page. Click |
 or
or  to view a different page.
Purging Error Logs
You can purge the log of a Transaction. All information about the Transaction, and errors will be deleted permanently. It is recommended that you purge logs on a periodic basis.
To Purge an Error Log
1. Select a transaction in the Transactions area, click Purge Log. You can purge multiple transactions. To select adjacent Transactions, click the first item, hold down the SHIFT key, and click the last item. For random selections, click the first item, hold down the CTRL key, and click the other items.
2. Specify whether you want to purge the log of the selected Transaction(s), or all Transactions.
3. Click Yes to confirm the action.